Blockchain Tutorial For Developers: Step-By-Step Guide
By Gregory McCubbin ·
The blockchain industry is booming with opportunity for developers. It's one of the fastest growing, highest paid fields in tech with an average salary of $155,000 per year in San Francisco.
I'll give you a hands-on introduction to blockchain development so that you can take advantage of this trend while it's still early. Use the 3-hour video below to accompany this written guide.
It doesn’t matter if you’re an experienced developer already, or if you are just learning to code. This guide is designed to teach you blockchain from square one.
I’ll teach you step-by-step how to build a full application -- a blockchain social network where you get paid post! You earn cryptocurrency rewards for creating great content.
Here is a sneak peak of the finished product:
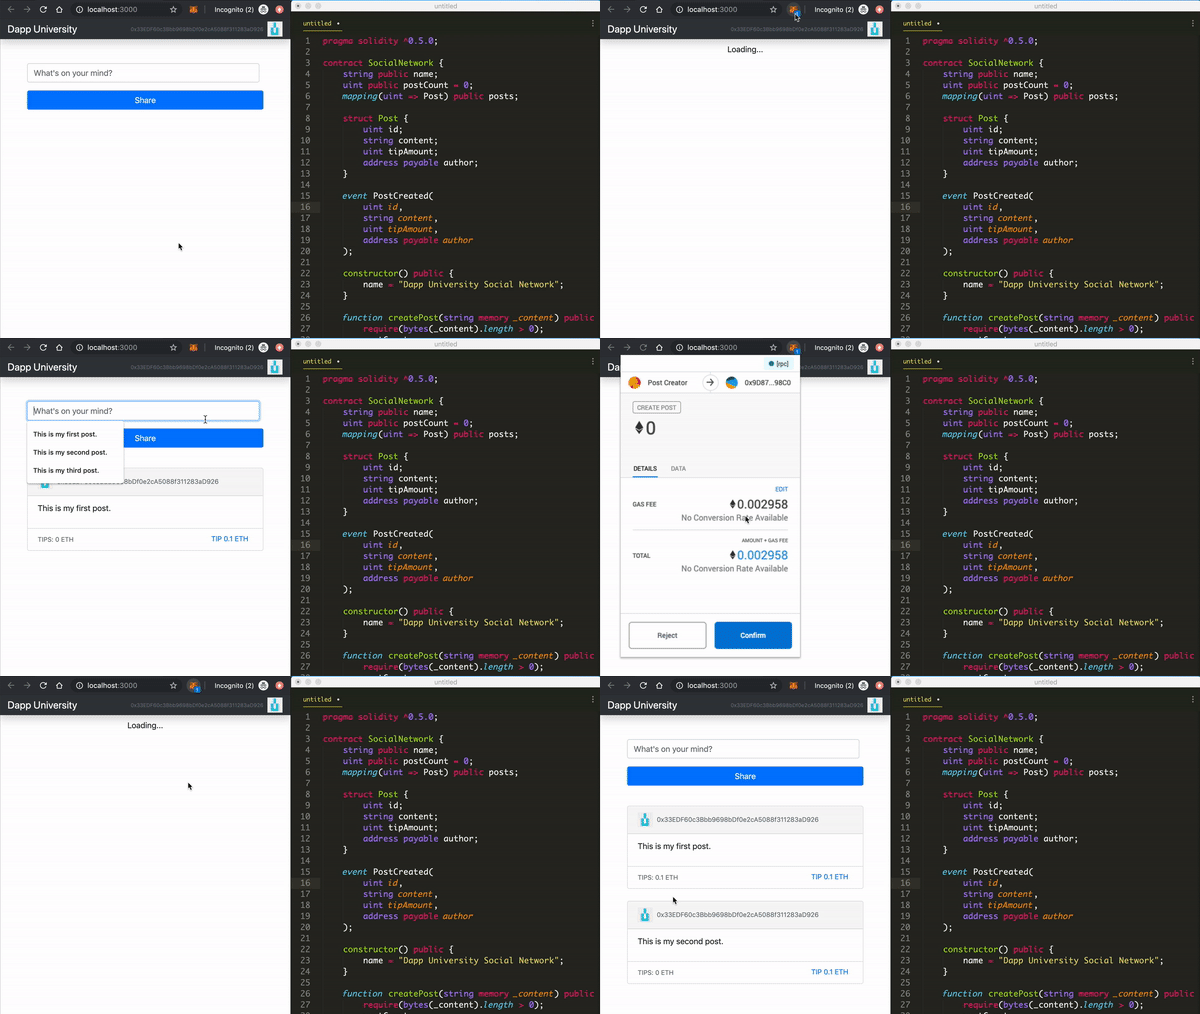
You might be thinking, “I don’t even know what a blockchain is, or how it works.” That’s okay. I’ll clarify all these concepts before we start coding.
Table of Contents
What is a Blockchain?
I'll use an analogy to explain how a blockchain works. Let's look at a bank.
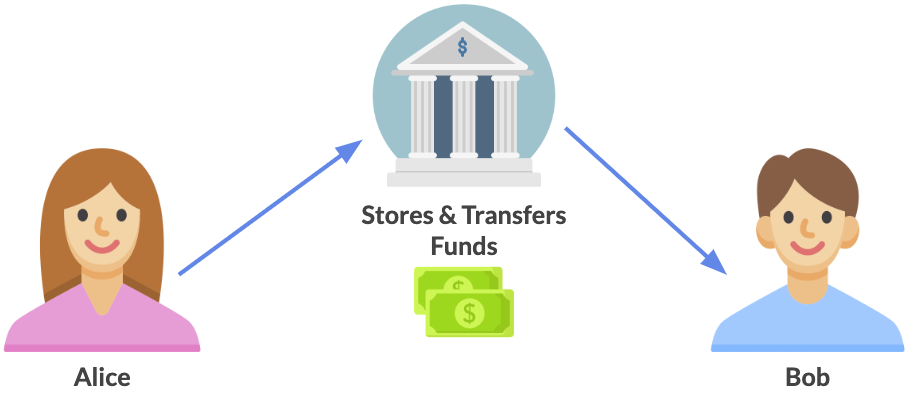
Suppose that Alice wants to send money to Bob with a wire transfer.
All of her money is stored inside a bank account, which has two primary purposes:
- It keeps track of how much money she has.
- It provides an online portal that allows her to perform the wire transfer to Bob.
Whenever Alice authorizes the wire transfer, her bank processes the transaction and transfers money from her account to Bob's.
Behind the scenes, the bank has two primary technical features that make this possible.
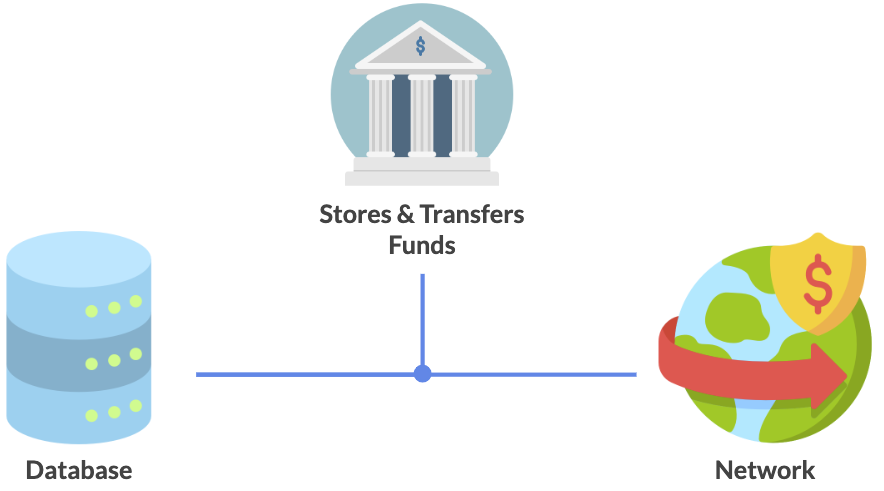
- A database - the bank maintains a database ledger of all Alice's transactions to determine her account balance and transaction history.
- A network - the bank uses a network to process wire transfers so that funds can be sent from her account to Bob's. It also gives her an online portal that she can connect to in order to do this.
Blockchain presents an alternative to this model by eliminating the need for a bank altogether.
Instead of sending money to Bob via wire transfer, she can send him cryptocurrency directly with a blockchain.

Much like a bank, the blockchain gives her a place to safely store her funds and send money to Bob. It replaces the two primary technical features of a bank.
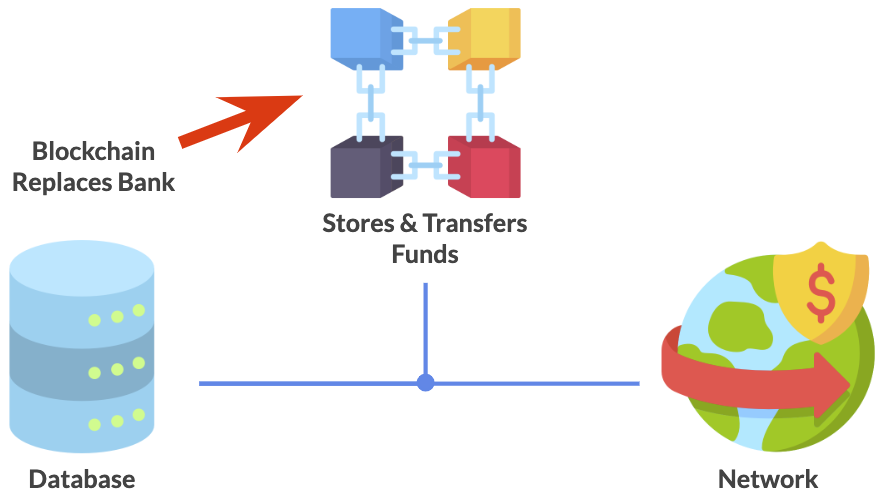
- A database - It that keeps track of how much money Alice has.
- A network - Alice can connect to a blockchain in order to send money. When she does, the blockchain processes her transaction, and moves the funds from her account to Bob's.
Because it serves both of these roles, you can think of a blockchain as both a network *and* a database at the same time. Let's examine both of these concepts further.
A blockchain is a peer-to-peer network, meaning it is a system of nodes, or computers, that all talk to one another.
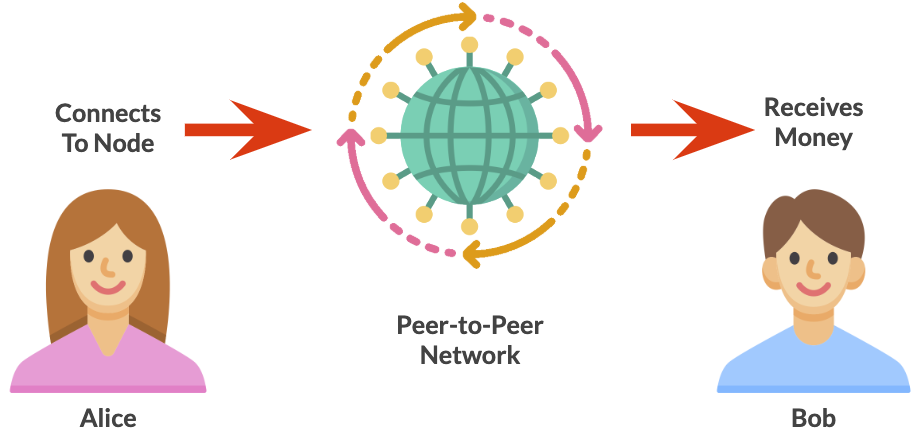
It is like a world-wide computer that fully replaces the bank.
It is responsible for processing transactions so that Alice can send money to Bob. She simply needs to connect to a node on the network to initiate her transaction, and the blockchain handles the rest behind the scenes (more on that in the next section).
Now let's examine how blockchain functions like a database.
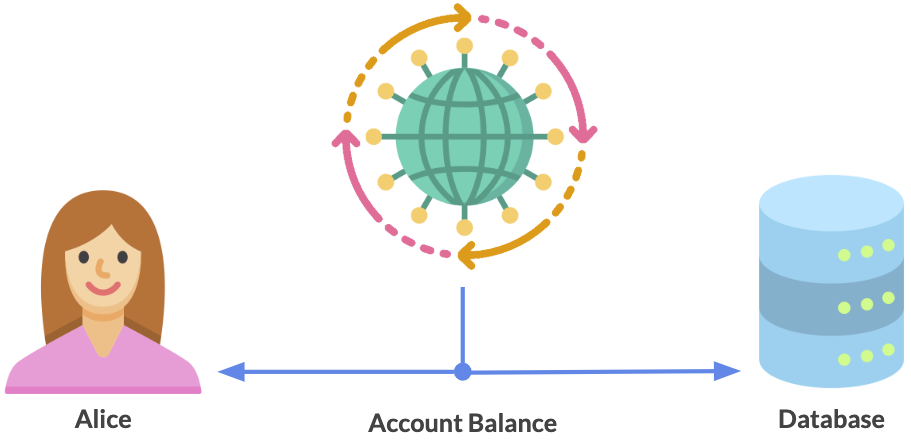
Each node on the network maintains a copy of the data on the blockchain. For example, they all know how much money Alice has in her account.
Instead of a bank storing all this data inside a central database, the blockchain stores it redundantly on each node in the network. This makes it virtually impossible to tamper with the data.
For example, Alice cannot manipulate her account balance, because all the other nodes know how much money she really has.
Blockchain Vs Cryptocurrency
It is important to note that blockchain and cryptocurrency are not the same thing.
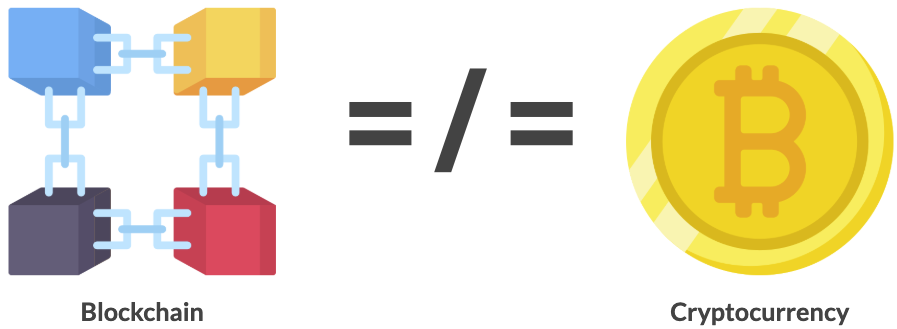
Bitcoin is a cryptocurrency, but blockchain is the underlying technology behind Bitcoin. Blockchains can be used for other purposes besides cryptocurrency which I'll demonstrate throughout this tutorial.
How Does A Blockchain Work Step-By-Step?
Let's continue on with the example from the previous section. Suppose Alice wants to send some Bitcoin cryptocurrency to Bob.
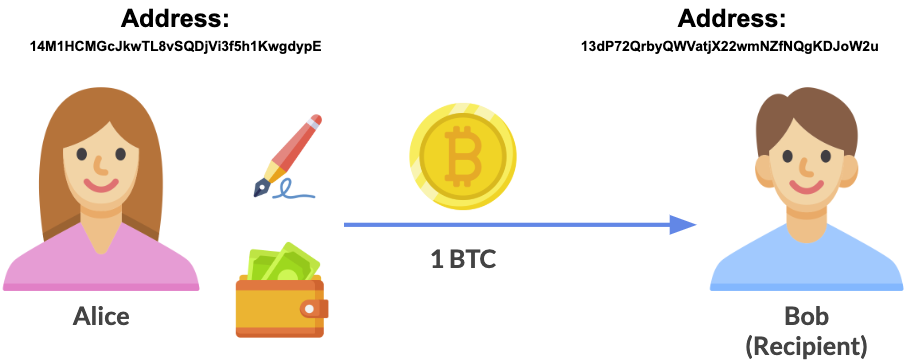
In order to do this, Alice and Bob each need an account on the Bitcoin blockchain. Their accounts are much like their usernames: Alice must know Bob's username, or account address, in order to send cryptocurrency to him.
Next, Alice needs a Bitcoin wallet in order to send the transaction. In this scenario, her wallet reflects that she owns 10 Bitcoin (wow!). This is called her "account balance".
Being very generous, she decides to send 1 BTC (Bitcoin) to Bob through this 3-step process:
- She enters Bob's account address as the recipient.
- She specifies that she wants to send 1 BTC to Bob.
- She signs the transaction in order to make it official.
In the last step, Alice signs the transaction with her private key. If her account address is like her username, then her private key is like her password. This is sensitive data stored inside her Bitcoin wallet, which she will not share with anyone else.
Alice's private key allows her to create digital signatures that authorize her transactions on the blockchian, like sending 1 BTC to Bob.
At this point, Alice has done everything she needs to in order to complete the transaction. The rest of the process happens behind the scenes on the Bitcoin blockchain. Let's see how that works.
After Alice's transaction has been signed, it is sent to to the Bitcoin network.
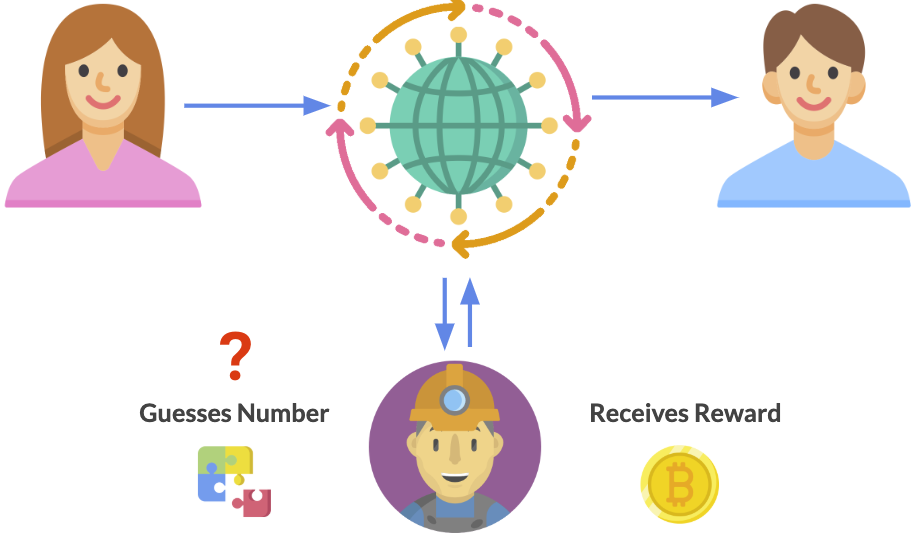
A select group of nodes called "miners" process her transaction, and record it on the blockchain.
Bitcoin miners must solve a mathematical puzzle called a "proof-of-work" problem in order to record Alice's transaction on the blockchain. Each miner competes with one another to guess a random encrypted number called a "nonce".
The miner that guesses this number first submits their answer, or "proof of work". This authorizes them to record the transaction to the blockchain and receive a Bitcoin reward for winning the mining competition.
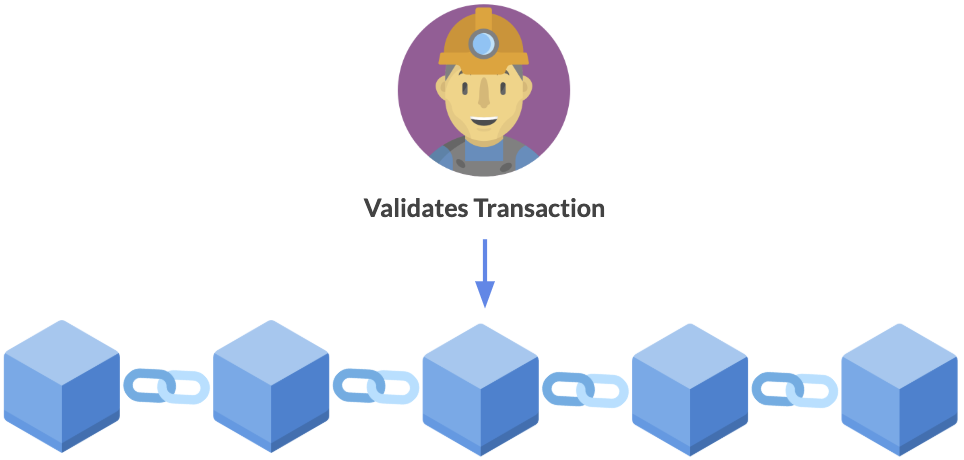
Whenever they record it, they create a new transaction record on the blockchain. Groupings of transactions are called "blocks" which get "chained together" to make up the blockchain.
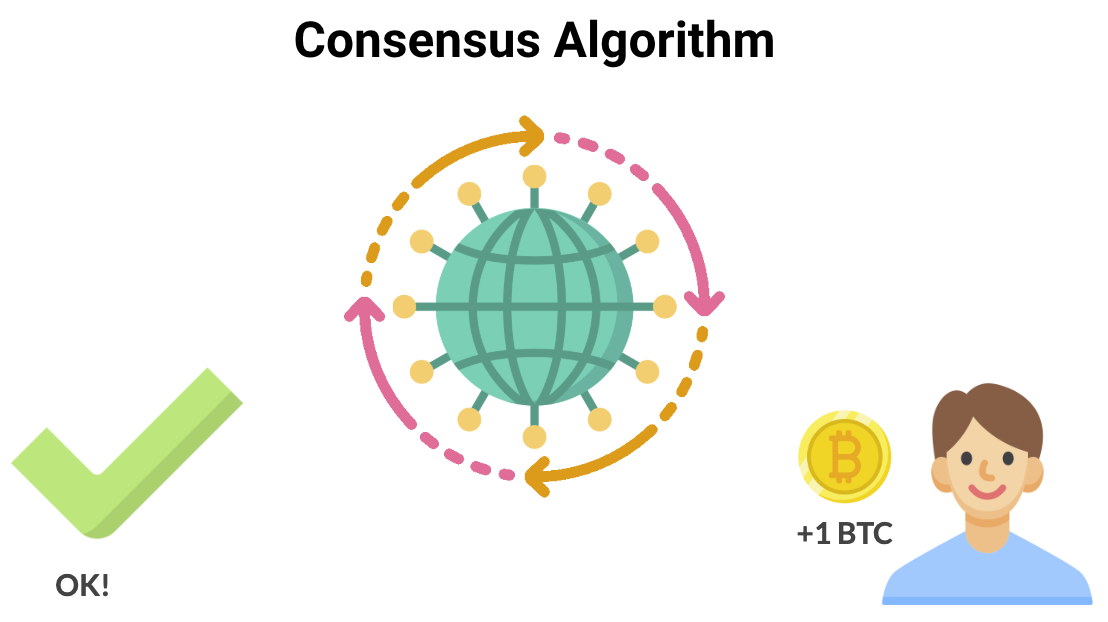
During the mining process, the network reaches "consensus", meaning that each node verifies that they have the same valid data as everyone else. This mechanism is called the "consensus algorithm". Effectively, each node says, "yes, I have a valid copy of Alice's transaction".
If they all agree, then the transaction is complete. The cryptocurrency is transferred from Alice's account to Bob's. When Bob checks his wallet, he'll see that he now has 1 BTC!
Why Do We Need Blockchain?
Let's continue on with our banking example. Here are some of the reasons Alice might choose to use the blockchain to store and send money:
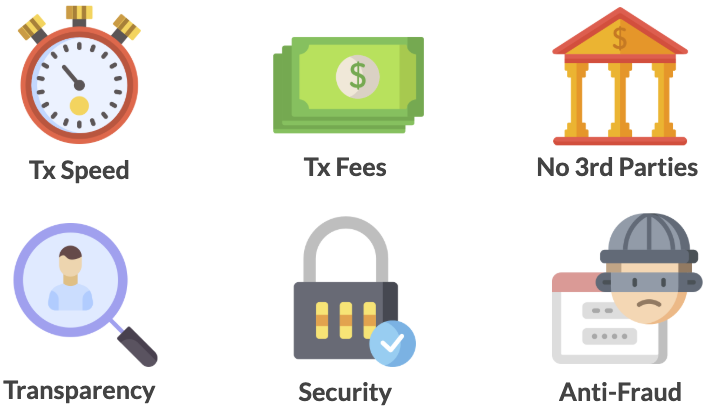
- Transaction Speed: Suppose Alice and Bob lived in different countries. An international wire transfer could take days to complete. Instead, Alice can send Bob Bitcoin in a matter of minutes.
- Transaction Fees: Let's say Bob is a merchant, and Alice wants to pay him money for a very expensive service, say $10,000. If Alice paid Bob with a credit card, Bob would incur a transaction fee around 2%, or $200. Because Bob is Alice's friend, she pays him with Bitcoin to save him money. Now Bob incurs no transaction fees, and Alice only pays a few extra dollars to send money to Bob.
- No 3rd Parties: Alice and Bob do not need to involve any 3rd parties in order to transact with one another.They do not need to sign any documents at a bank or wait for clearance in order to send and receive money.
- Transparency: Instead of a bank storing all of her account data inside a central database, it is instead stored on the blockchain. She can verify all of her account balance and transactions on the secure network.
- Security: Traditional databases and IT systems can be vulnerable to attack. It is virtually impossible to "hack" the Bitcoin blockchain to change Alice's account balance or transaction history.
- Anti-Fraud: Because blockchain transactions are publicly verifiable, they enable companies to build anti-fraud solutions that make it very hard to fake transactions or embezzle funds.
How To Become A Blockchain Developer
Up until now, we have discussed how to send money with the Bitcoin blockchain. Now I want to focus on how to build applications that run on the blockchain. Bitcoin is quite limited in this area, so we will instead look at a different blockchain called Ethereum.
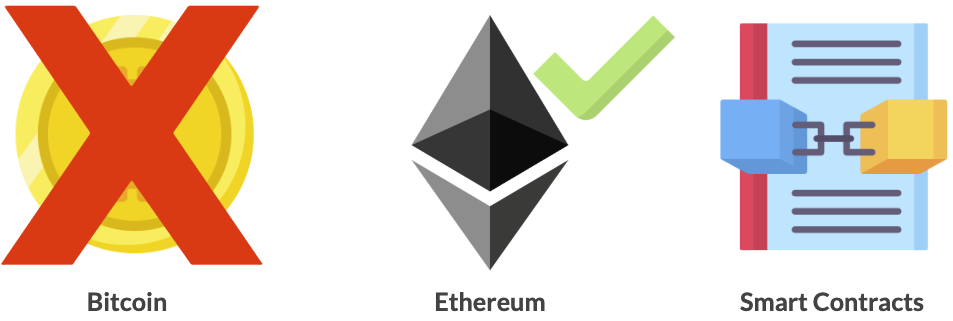
In addition to sending cryptocurrency, Ethereum allows developers to create decentralized applications, or dApps, that run on the blockchain. Ethereum achieves this with smart contracts, which are programs that run on the blockchain. Let's see how these apps work.
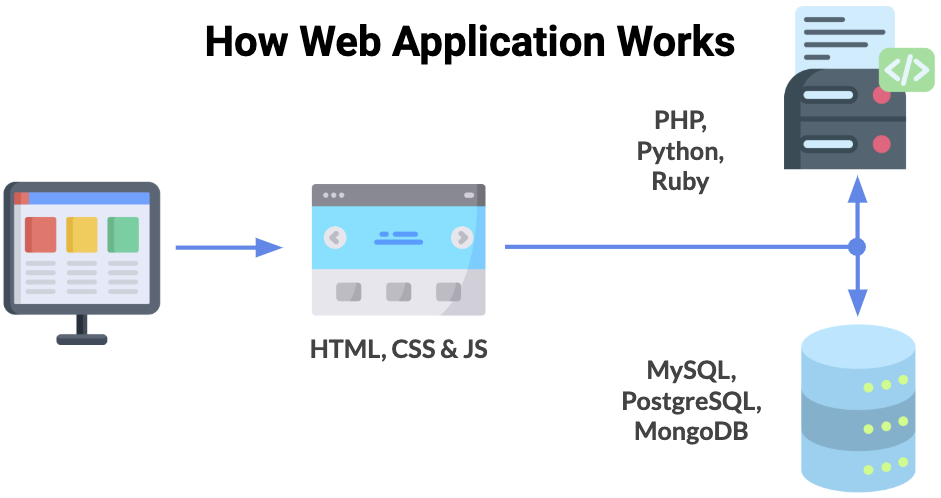
Normally when you use a web application, you use a web browser to load a web page that talks to a central web server over a network. All of the code for this app lives inside this central server, and all the data is housed inside a central database.
Anytime you transact with this application, you must interact directly with this central server. This presents a few problems. The application creators could change the application code on the server, or the database at any time because they have full control.
We can eliminate these problems by using the blockchain instead.
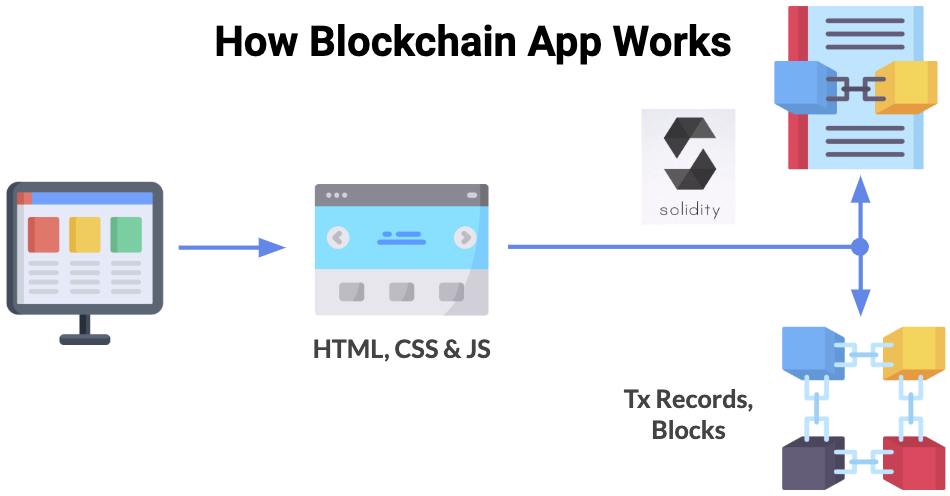
We can use our browser to load a web page that talks directly to the blockchain instead of a backend server and database. We can store all of the application code and data on a blockchain instead of this central server. This is a fully transparent and trustworthy way of knowing that the application code and data won't change. Why?
All of the backend code for the application will be made up of smart contracts. These are immutable (a.k.a. "unchangeable") building blocks of blockchain applications. Once the code is put on the blockchain, no one can change it, and we know it will work the same way every time.
Smart contracts are written in a language called Solidity which looks a lot like JavaScript. They're in charge of reading/writing data to the blockchain, and executing any business logic that we program. They work much like a microservice on the web. Also, they're called smart contracts because they represent an unchangeable digital covenant, or agreement.
All of the data for the application will be stored as transaction records, inside of blocks on the blockchain. As we saw earlier, each node on the network maintains a copy of this data to ensure that it is secure and unchanged.
That's how a blockchain application works from a high level. In the next section, we'll get a closer look by building one together.
How To Build A Blockchain Application
Let's get a much deeper understanding of how blockchain works by building a full-stack application step-by-step. Here is a preview of the app that we'll build together:

This is a blockchain social network powered by smart contracts where you can get paid to post.
Other users can tip your status updates with cryptocurrency, so that you’re rewarded for creating great content.
It's censorship resistant, so nobody can restrict the content that you post or see.
We’ll even curate the news feed so that the most tipped posts appear at the top, instead of relying upon "an algorithm" that nobody understands.
It also has a slick mobile-friendly user interface, where everyone gets a fancy icon automatically for their account.
We'll accomplish these main objectives in the next sections:
- We’ll set up a blockchain.
- Next, we'll develop smart contracts for the social network.
- Finally, we'll create a client side website so that anyone can use our app and post to the newsfeed.
Part 1: Project Setup
Now let's set up our development environment to start coding. We'll install all the dependencies we need to build the project.
Node.JS
The first dependency you'll need is Node.js, which will give you Node Package Manager (NMP). We'll use NPM to install other dependencies in this tutorial. You can check if you already have Node installed by executing this command from your terminal:
$ node -vIf you don't have it installed yet, you can download it directly from the Node.js website.
Ganache Blockchain
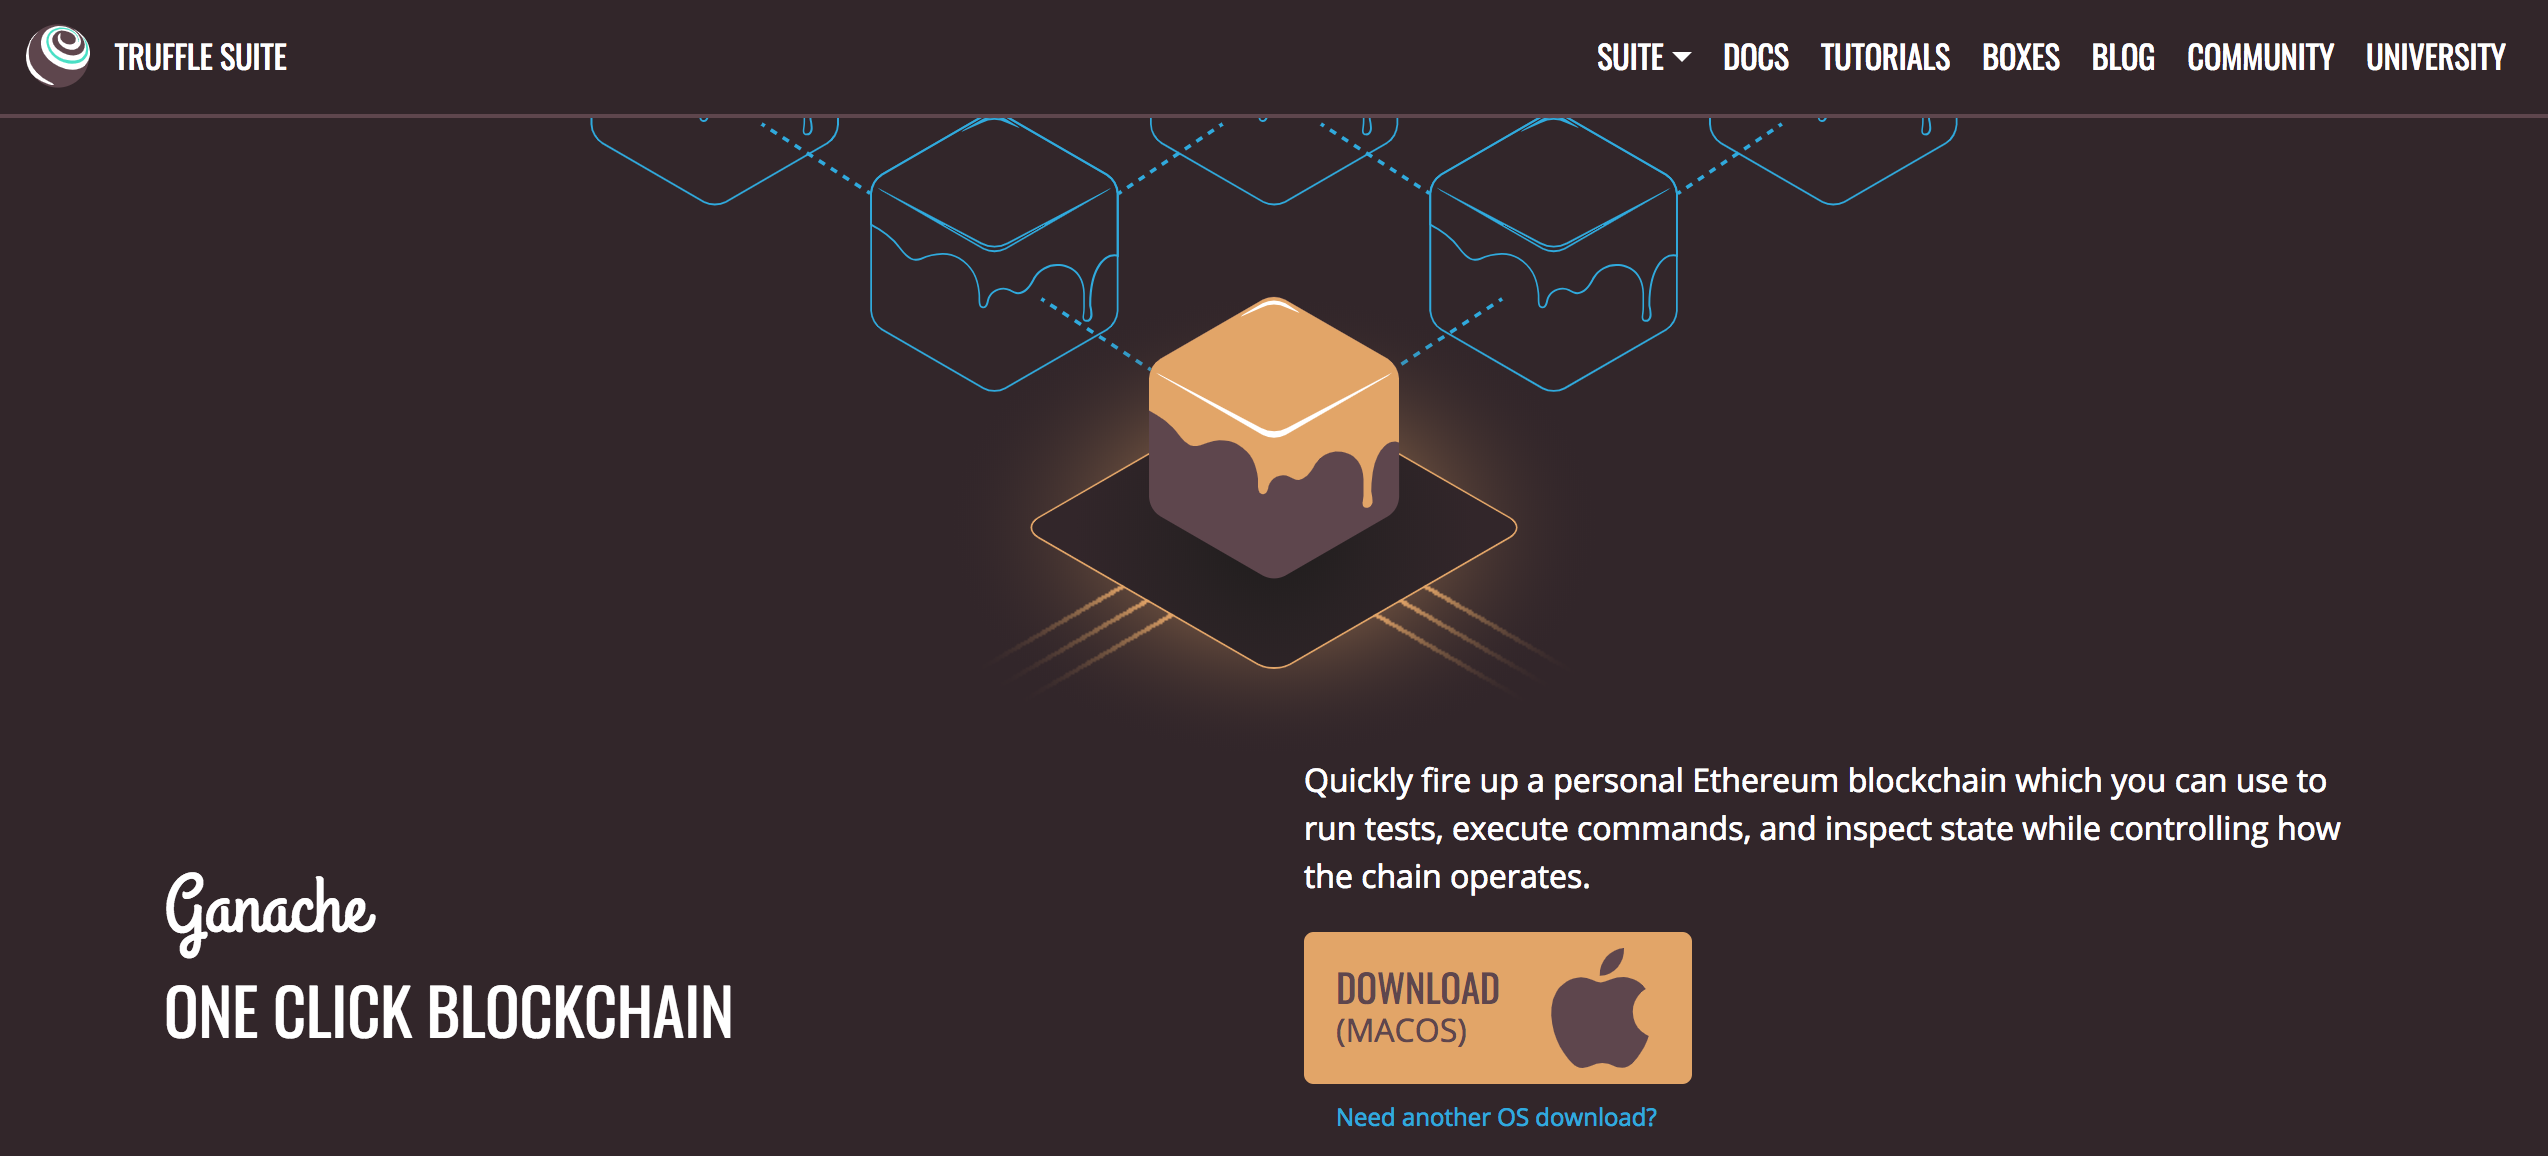
The next dependency is a development blockchain, which can be used to mimic the behavior of a production blockchain. We'll use Ganache as our development blockchain for this tutorial. We can use it to develop smart contracts, build applications, and run tests. Find the latest release for your operating system here.
Truffle Framework
The next dependency is the Truffle Framework, which gives us a suite of tools for developing blockchain applications. It will enable us to develop smart contracts, write tests against them, and deploy them to the blockchain.
Install Truffle from the command line with NPM like this (NOTE: you must use this exact version of Truffle to follow along with this guide):
$ npm install -g [email protected]Metamask Ethereum Wallet
Now let's install the Metamask Ethereum Wallet in order to turn our web browser into a blockchain browser. Your current web browser most likely doesn't support this natively, so we need the Metamask extension for Google Chrome in order to connect to the blockchain.
Visit this link to install Metamask, or simply search for it in the Google Chrome web store. Upon installation, ensure that you've enabled it in your list of Chrome extensions (it should be "checked"). When it's active, you will see a fox icon in the top right hand corner of your browser.
Project Setup
Now that we have installed all the dependencies we need, let's build our blockchain app!
Find where you installed Ganache, and open it. Once it's loaded, you have a blockchain running on your computer!
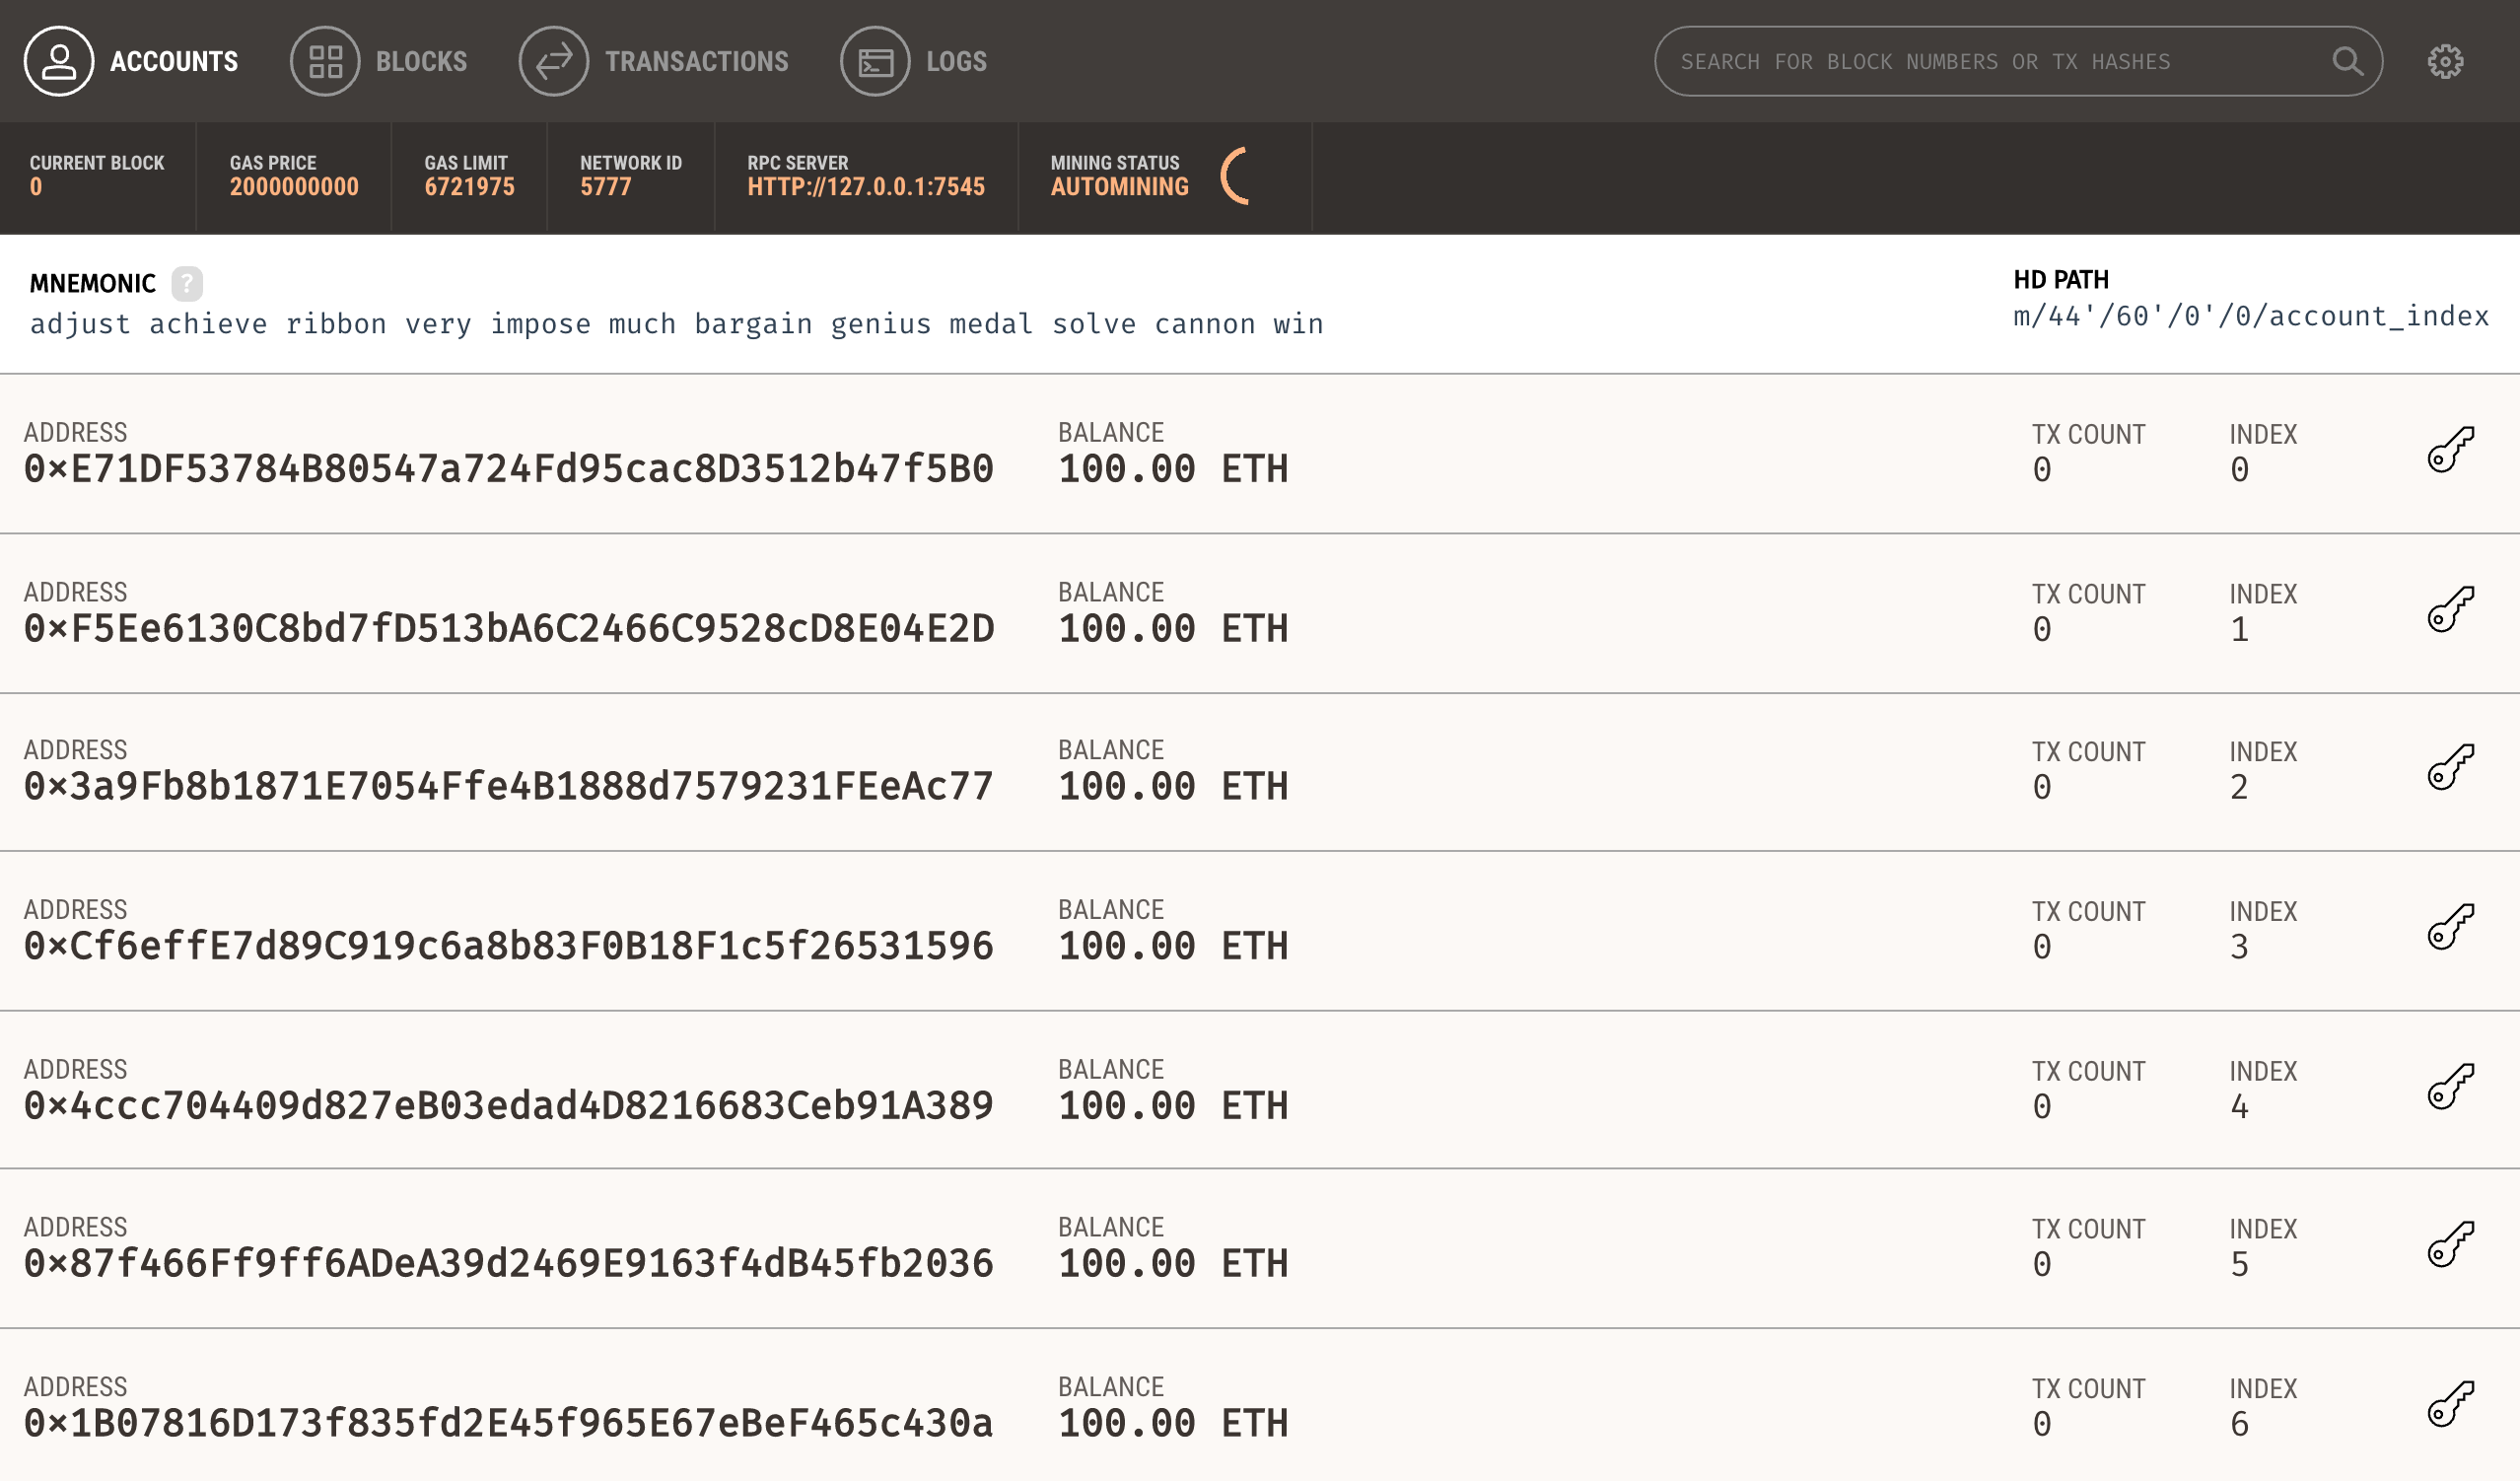
You should see 10 accounts provided by Ganache, each pre-mined with 100 fake Ether (don't get excited, this Ether isn't worth real money).
Each account has a unique public and private key pair. You can see each account's address on the main screen here. Remember, accounts are much like "usernames" on the blockchain, and they represent each user who can post to our social network.
Now let's create a new project for all of our application code. Instead of doing this from scratch, I'm going to use a template that I created to help us get started quickly. You can clone this template from github like this:
$ git clone https://github.com/dappuniversity/starter_kit social-networkNow you can enter into the newly created project folder just like this:
$ cd social-network🎉 Hooray! The project is set up instantly. Let's take a look around to see what we generated.
Open the project in your text editor of choice, and find the truffle-config.js file. This is where we will store all of the settings for our Truffle project.
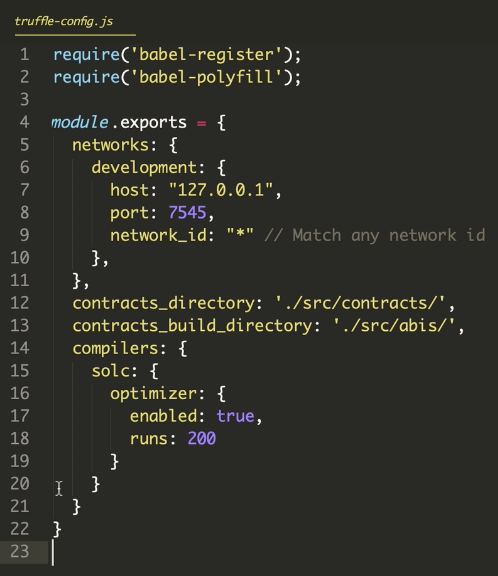
I have already configured the project to connect to the Ganache development blockchain on 127.0.0.1 port 7545 (you can see that under the networks > development section).

Next, notice that I have specified new values for the contracts_directory and contracts_build_directory.
I have changed this from the default Truffle project configuration so that we can access these files from our front end application in the src directory. These values are normally ./contracts/ and ./build/contracts/.
Here is a complete list of all the files inside our project:

- migrations directory: this is where the migration files will live that allow us to put new smart contracts on the blockchain.
- node_modules directory: this is where all of our dependencies get installed for the project.
- public directory: this where we'll store the images for the project.
- src directory: this is the main folder for our client-side website, and our smart contract source code.
- ./src/components directory: this is where we will develop all of the React.js components that power our client side website.
- ./src/contracts directory: this is the folder where we will develop the source code for our smart contracts with Solidity (remember, we customized this directory in the previous step).
Next, let's look at the package.json file.
This file contains all of the project dependencies we need to build the application. I have included all the dependencies we need inside this starter kit template.
Let's go ahead and install these dependencies like this:
$ npm installNow, let's boot up our web server to ensure that everything worked properly:
$ npm run startIf you did everything correctly, your web browser should open automatically to a page that looks like this:
🎉 YAY! You've just set up the project. This is all of the template code that we will modify to create our app.
You can see that we got several nice freebies by installing this stater kit:
- Bootstrap: the project already includes the Bootstrap UI framework. Our project will look really nice without having to write a bunch of custom CSS ourselves.
- React.js: the project already has React.js configured to help us create a rich user interface without writing boilerplate JavaScript code ourselves. All the code you see on screen right now is contained inside the
App.jscomponent.
Now, let's code the smart contract to power the backend of the social network app. It will be in charge of reading/writing to and from the blockchain. It will allow users to create new posts so that they can be shared in the newsfeed and tipped by other users.
Create a new file from your terminal like this:
$ touch ./src/contracts/SocialNetwork.solThis is the file where we'll write all the Solidity source code for the smart contract (just a reminder, this is inside a custom src directory, which is different from a default truffle project).
Let's create a simple "systems check" to ensure that our project is set up properly, and that we can deploy this smart contract to the blockchain successfully. Start by entering this code into the SocialNetwork.sol file:
pragma solidity ^0.5.0;

contract SocialNetwork {
    // State variable
    string public name;

    // Constructor function
    constructor () public {
        name = "Dapp University Social Network";
    }
}
I'll explain this code. The first line declares the Solidity programming language version that we'll use, i.e., pragma solidity ^0.5.0;.
Next, we create the smart contract with the contract keyword, followed by the smart contract name Social Network. All of the source code for the smart contract will live inside the curly braces after that {...}.
Next, we define a state variable that will represent the name of our smart contract. This state variable's value will get stored directly to the blockchain itself, unlike a local variable which will not.
We specify that this variable is a string. We must do this because Solidity is a statically typed language, meaning once we specify that this variable is a string, it cannot be a different data type later like a number.
Then we declare the state variable public with a modifier. This tells Solidity that we want to read this variable value from outside the smart contract. Because we have done this, Solidity will automatically create a name() function behind the scenes that will return this variable's value (we won't have to code it ourselves).
Finally, we create a constructor function with the constructor keyword. This is a special function that gets called only once whenever the smart contract is created, i.e., deployed to the blockchain.
Inside this function, we set the value of the name state variable to "Dapp University Social Network".
That's it! Now that we've created the basic smart contract, let's deploy it to the blockchain.
In order to do this, we must create a new migration file. Truffle uses these migrations to add new files to the blockchain. These are similar to migration files in other development frameworks where you make changes to a database, like adding new columns in tables.
We can create a new file inside the migrations directory like this:
$ touch migrations/2_deploy_contracts.jsNote: this file is numbered so that Truffle knows the order to run the migrations in.
Inside this file, add the following code:
var SocialNetwork = artifacts.require("./SocialNetwork.sol");

module.exports = function(deployer) {
  deployer.deploy(SocialNetwork);
};
This code simply tells Truffle that we want to deploy the Social Network smart contract to the blockchain. Don't worry if you don't understand everything inside this file. It is essentially a copy-and-paste of the 1_initial_migrations.js file, except the smart contract names are changed.
Now let's put this smart contract on the blockchain (i.e. Ganache) by running the migrations from the command line like this:
$ truffle migrateNow let's open the Truffle console to interact with the smart contract like this:
$ truffle consoleInside the console, we can write JavaScript code to interact with our development blockchain and smart contracts. Let's fetch an instance of the deployed social network smart contract and store it to a variable like this:
contract = await SocialNetwork.deployed()
// => undefined
You'll see that the console returns undefined here. That's ok. We simply need to enter the variable name to return is value like this:
contractNow you should see a JavaScript version of your smart contract inside the console.
We can read the address like this:
contract.addressThis is the unique address of the smart contract on the blockchain.
Next, let's read the name of the smart contract like this:
name = await contract.name()
// undefined
name
// => 'Dapp University Social Network'
Again, you must call the name variable from the console to read its value.
Congratulations! You have just coded your first smart contract and deployed it to the Ethereum blockchain.
Part 2: Create Posts
Let's continue building out the smart contract. As we write the Solidity code, we will simultaneously write tests for the smart contract with JavaScript inside a separate file with for a few reasons:
- It will save us time. Any time we make changes to the smart contract, we can ensure that all of the code we wrote before still works. Imagine having to hand-check this in the console every time!
- It is vital to ensure that our smart contracts work properly before putting them on the blockchain. Remember, all the smart contract code is immutable. Once it's deployed to the blockchain, we cannot change it. Our tests will ensure that the code is bug free before deployment.
Let's create a new directory for the test file like this:
$ mkdir testNow, let's create a new file for the test like this:
$ touch ./test/SocialNetwork.test.js Inside this file, we can scaffold a test for the smart contract with the help of the Mocha testing framework and the Chai assertion library that comes bundled with the Truffle framework. Let's start off with this basic code:
const SocialNetwork = artifacts.require('./SocialNetwork.sol')

require('chai')
  .use(require('chai-as-promised'))
  .should()

contract('SocialNetwork', (accounts) => {
  let socialNetwork

  before(async () => {
    socialNetwork = await SocialNetwork.deployed()
  })

  describe('deployment', async () => {
    it('deploys successfully', async () => {
      const address = await socialNetwork.address
      assert.notEqual(address, 0x0)
      assert.notEqual(address, '')
      assert.notEqual(address, null)
      assert.notEqual(address, undefined)
    })

    it('has a name', async () => {
      const name = await socialNetwork.name()
      assert.equal(name, 'Dapp University Social Network')
    })
  })
})
This basic test checks for 2 things:
- The smart contract was successfully deployed, i.e., it has an address.
- The name is correct, i.e., "Dapp University Social Network".
This code should look very similar to the operations we performed inside the console from the previous section. Check out the companion video for a more detailed explanation of this test.
Now let's run the test suite like this:
$ truffle test 🎉 YES!!! They pass!
Now that the test suite is set up, let's continue developing the smart contract. We'll program a way for users to create new posts in the social network.
We'll start by creating a new function like this:
function createPost(string memory _content) public {
    // More code goes inside here...
}
We use the function keyword followed by the name createPost, and then specify that it accepts one argument _content for the post's text.
Finally, we use the public modifier to ensure that we can call the function outside the smart contract, i.e., from our tests or the client side website.
Next, we need a way to model the post. We'll use a Struct for this. Solidity allows us to define our own data structures with Structs. In our case, we'll define a Post struct like this:
contract SocialNetwork {
    // ...

    struct Post {
        uint id;
        string content;
        uint tipAmount;
        address payable author;
    }

    // ...
}
This struct allows us store the post's id, content, tip amount, and author. We declare the data type for each of these values in the code above.
Next, let's create a way to store new posts on the blockchain. We'll use a Solidity mapping to do this:
contract SocialNetwork {
    // ...

    mapping(uint => Post) public posts;

    // ...
}
This mapping will uses key-value pairs to store posts, where the key is an id, and the value is a post struct. These mappings are a lot like associative arrays or hashes in other programming languages.
Whenever we add new posts to the mapping, they will be stored on the blockchain. Because we used the public modifier we can also fetch posts by calling the posts() function, which Solidity will create behind the scenes.
Next, let's create a counter cache to generate post ids like this:
contract SocialNetwork {
    // ...

    uint public postCount = 0;

    // ...
}
We will increment this value whenever new posts are created to generate post ids (we'll see that in action momentarily).
Now let's put it all together and create new posts inside of the function like this:
function createPost(string memory _content) public {
    // Increment the post count
    postCount ++;
    // Create the post
    posts[postCount] = Post(postCount, _content, 0, msg.sender);
}
Let me explain this code:
- First, we increment the post count to create a new post id. Initially, this value was 0. We change it to 1 with the
++operator because this is the first post. Subsequent function calls will follow this pattern, i.e. 2, 3, 4, etc... - Next, we instantiate a new post struct with
Post(), and pass in the id, content, tip amount, and author. - Finally, we add the new post to the post mapping by passing in the id
postCount, and setting it equal to the newPoststruct.
I will also note that we use msg.sender to determine the author's account address. This is a special variable value provided by Solidity that tells us the user who called the function. We don't have to pass this value in as a function argument. We get it magically with Solidity.
Now, let's trigger an event whenever the post is created. Solidity allows us to create events that external consumers can subscribe to like this:
contract SocialNetwork {
    // ...

    event PostCreated(
        uint id,
        string content,
        uint tipAmount,
        address payable author
    );

    // ...
}
Now we can trigger this event inside the function like this:
function createPost(string memory _content) public {
    // Increment the post count
    postCount ++;
    // Create the post
    posts[postCount] = Post(postCount, _content, 0, msg.sender);
    // Trigger event
    emit PostCreated(postCount, _content, 0, msg.sender);
}
Lastly, let's add a validation to ensure that users can't post blank content. We'll do that in the first line of our function like this:
function createPost(string memory _content) public {
    // Require valid content
    require(bytes(_content).length > 0);
    // Increment the post count
    postCount ++;
    // Create the post
    posts[postCount] = Post(postCount, _content, 0, msg.sender);
    // Trigger event
    emit PostCreated(postCount, _content, 0, msg.sender);
}
This uses Solidity's require to ensure that the post has content before the rest of the code executes. If the expression inside require evaluates to true, the function will continue execution. If not, it will halt.
That's it! That's the complete code for creating new posts. At this point your smart contract code should look like this:
contract SocialNetwork {
    string public name;
    uint public postCount = 0;
    mapping(uint => Post) public posts;

    struct Post {
        uint id;
        string content;
        uint tipAmount;
        address payable author;
    }

    event PostCreated(
        uint id,
        string content,
        uint tipAmount,
        address payable author
    );

    constructor() public {
        name = "Dapp University Social Network";
    }

    function createPost(string memory _content) public {
        // Require valid content
        require(bytes(_content).length > 0);
        // Increment the post count
        postCount ++;
        // Create the post
        posts[postCount] = Post(postCount, _content, 0, msg.sender);
        // Trigger event
        emit PostCreated(postCount, _content, 0, msg.sender);
    }
}
Now, let's add some test examples to ensure that this function works. Add this code to your test file:
describe('posts', async () => {
    let result, postCount

    before(async () => {
      result = await socialNetwork.createPost('This is my first post', { from: author })
      postCount = await socialNetwork.postCount()
    })

    it('creates posts', async () => {
      // SUCESS
      assert.equal(postCount, 1)
      const event = result.logs[0].args
      assert.equal(event.id.toNumber(), postCount.toNumber(), 'id is correct')
      assert.equal(event.content, 'This is my first post', 'content is correct')
      assert.equal(event.tipAmount, '0', 'tip amount is correct')
      assert.equal(event.author, author, 'author is correct')

      // FAILURE: Post must have content
      await socialNetwork.createPost('', { from: author }).should.be.rejected;
    })

  })
})
Next, modify the top of your test suite to look like this:
contract('SocialNetwork', ([deployer, author, tipper]) => {
    // ...
}
This test checks for all the behavior we just added:
- It checks that the post count was incremented, and that is now equal to 1.
- Then, it digs into the transaction logs to inspect the post value from the event that we triggered inside the function. We check that the post id, content, tip amount, and author are correct.
- Finally, we check that the function rejects posts that don't have any content.
Also, we modified the test suite to include 3 different users: deployer, author, and tipper. We can do this instead of using the accounts variable that was injected by default.
Now let's run the tests like this:
$ truffle test 🎉 YAY! They pass.
Part 3: Tip Posts
In this section, we'll create a function that allows users to tip others post with cryptocurrency. Before we do that, let's address a few things.
First, I want to explain the concept of "gas".
Any time we store data on the Ethereum blockchain, we must pay a gas fee with Ether (Ethereum's cryptocurrency). This is used to pay the miners who maintain the network.
Since we stored a new post on the blockchain, a small fee was debited from our account. You can see that your account balance has gone down in Ganache.
While storing data on the blockchain costs money, fetching does not. In summary, reads are free, but writes cost gas.
Next, we need to add a test to ensure that we can list out all of the posts from the social network. Inside your test file, use this code:
it('lists posts', async () => {
  const post = await socialNetwork.posts(postCount)
  assert.equal(post.id.toNumber(), postCount.toNumber(), 'id is correct')
  assert.equal(post.content, 'This is my first post', 'content is correct')
  assert.equal(post.tipAmount, '0', 'tip amount is correct')
  assert.equal(post.author, author, 'author is correct')
})
Now let's move on to creating a function that allows other users to tip posts with cryptocurrency:
function tipPost(uint _id) public payable {
    // ...
}
This function accepts the post id as its only argument. Note, that we use a new modifier called payable. This allows us to send cryptocurrency whenever we call this function. This uses function metadata instead of passing in cryptocurrency as a function argument.
Let's add the code to tip the author whenever this function is called:
function tipPost(uint _id) public payable {
    // Fetch the post
    Post memory _post = posts[_id];
    // Fetch the author
    address payable _author = _post.author;
    // Pay the author by sending them Ether
    address(_author).transfer(msg.value);
    // Increment the tip amount
    _post.tipAmount = _post.tipAmount + msg.value;
    // Update the post
    posts[_id] = _post;
}
Let me explain how this works:
- First, we fetch the post from the blockchain and store a new copy in memory.
- Next, we store the post author to a variable.
- Then, we send the cryptocurrency to the author with the
transferfunction. Solidity allows us to read the cryptocurrency value with the specialmsg.valuevariable. - Next, we increment the tip amount for the post.
- Finally, we save the updated post values by adding it back to the mapping, and storing it on the blockchain.
Awesome! That's the basic tipping functionality. Let's do a few more things before we finish this function.
Let's define an event that gets triggered any time a new tip is created like this:
event PostTipped(
    uint id,
    string content,
    uint tipAmount,
    address payable author
);
Now let's trigger this event in the last line of the function like this:
function tipPost(uint _id) public payable {
    // Fetch the post
    Post memory _post = posts[_id];
    // Fetch the author
    address payable _author = _post.author;
    // Pay the author by sending them Ether
    address(_author).transfer(msg.value);
    // Increment the tip amount
    _post.tipAmount = _post.tipAmount + msg.value;
    // Update the post
    posts[_id] = _post;
    // Trigger an event
    emit PostTipped(postCount, _post.content, _post.tipAmount, _author);
}
Finally, let's add a validation that the post exists in the first line of the function like this:
function tipPost(uint _id) public payable {
    // Make sure the id is valid
    require(_id > 0 && _id <= postCount);
    // Fetch the post
    Post memory _post = posts[_id];
    // Fetch the author
    address payable _author = _post.author;
    // Pay the author by sending them Ether
    address(_author).transfer(msg.value);
    // Increment the tip amount
    _post.tipAmount = _post.tipAmount + msg.value;
    // Update the post
    posts[_id] = _post;
    // Trigger an event
    emit PostTipped(postCount, _post.content, _post.tipAmount, _author);
}
Great! Now you've successfully implemented the tipping functionality.
Let's finish this section off by adding some test coverage. Use this code inside your test file:
it('allows users to tip posts', async () => {
  // Track the author balance before purchase
  let oldAuthorBalance
  oldAuthorBalance = await web3.eth.getBalance(author)
  oldAuthorBalance = new web3.utils.BN(oldAuthorBalance)

  result = await socialNetwork.tipPost(postCount, { from: tipper, value: web3.utils.toWei('1', 'Ether') })

  // SUCESS
  const event = result.logs[0].args
  assert.equal(event.id.toNumber(), postCount.toNumber(), 'id is correct')
  assert.equal(event.content, 'This is my first post', 'content is correct')
  assert.equal(event.tipAmount, '1000000000000000000', 'tip amount is correct')
  assert.equal(event.author, author, 'author is correct')

  // Check that author received funds
  let newAuthorBalance
  newAuthorBalance = await web3.eth.getBalance(author)
  newAuthorBalance = new web3.utils.BN(newAuthorBalance)

  let tipAmount
  tipAmount = web3.utils.toWei('1', 'Ether')
  tipAmount = new web3.utils.BN(tipAmount)

  const exepectedBalance = oldAuthorBalance.add(tipAmount)

  assert.equal(newAuthorBalance.toString(), exepectedBalance.toString())

  // FAILURE: Tries to tip a post that does not exist
  await socialNetwork.tipPost(99, { from: tipper, value: web3.utils.toWei('1', 'Ether')}).should.be.rejected;
})
Let me explain how this test works. First, we ensure that the author receives a tip through this 3-step process:
- We store the author's original account balance inside a variable called
oldAuthorBalance. - We call the tip function.
- We ensure that the author's new balance increased by the same amount as the tip.
In this scenario, the tipper sends 1 Ether to the author. However, you see a very large value of '1000000000000000000' in the test. This is the "wei" value which is equal to 1 Ether. Wei is like Ethereum's penny (a very small penny). We must use the wei value because Solidity smart contracts do not support fractional cryptocurency.
We must represent all cryptocurrency values as wei inside the smart contracts. Luckily, the web3.js library provides a helper that we can use for these conversions: web3.utils.toWei('1', 'Ether').
Finally, we pass this value into the function metadata with the value key to specify the amount of crypocurrency we want to send like this:
await socialNetwork.tipPost(postCount, { from: tipper, value: web3.utils.toWei('1', 'Ether') })And that's it! Let's run the tests to see if they pass:
$ truffle test 🎉 They pass, awesome!
Last but not least, let's deploy the completed smart contract to the Ganache development blockchain so that we can start building out the client side application in the next section:
$ truffle migrate --reset Note: we use the -- reset flag here to deploy a new copy of the smart contract to the blockchain. Remember, we cannot update smart contract code once it's deployed to the blockchain. We can only deploy a new copy. That's exactly what we did here.
Part 4: Frontend Setup
Now let's start begin building the website for the social network. Here is what we'll accomplish in this section:
- Connect our web browser to the blockchain
- Connect our web app to the blockchain
- Show our account on the page, with a special user icon.
$ npm run startNow, locate the App component in the ./src/components/App.js file.
This is file contains a React.js component that currently stores all the code for the client side website.
Let me explain why we're using React.js in this tutorial. We need a way to code all of the client side behavior of our social network website, and interact with the blockchain. Instead of writing all of this by hand, React gives us this ability by organizing all of our code inside of reusable components. It also gives us a way to manage the application state with the React state object. Finally, we can write both HTML and JavaScript inside this file to create the front end application.
Let's modify this code to connect the app to the blockchain. We'll do this with the Web3.js library. We already installed in from our package.json file. All we need to so is import it at the top of our file like this:
import Web3 from 'web3'Next, let's create a function that connects our app to the blockchain like this:
async loadWeb3() {
  if (window.ethereum) {
    window.web3 = new Web3(window.ethereum)
    await window.ethereum.enable()
  }
  else if (window.web3) {
    window.web3 = new Web3(window.web3.currentProvider)
  }
  else {
    window.alert('Non-Ethereum browser detected. You should consider trying MetaMask!')
  }
}
This code detects the presence of an Ethereum provider in the web browser, provided by Metamask (more on that momentarily). These are the exact instructions that Metamask gives us for loading web3 in our app. Don't worry if you don't fully understand this. That's okay! We're simply following the default pattern.
Now we can call this function whenever the react component is loaded like this:
async componentWillMount() {
  await this.loadWeb3()
}
Great! Now the app is connected to the blockchain.
Next, let's import our accounts from Ganache into Metamask. You can watch me do this on screen step-by-step at this point in the video.
Once you've done that, let's fetch the account from Metamask inside a new function like this:
async loadBlockchainData() {
  const web3 = window.web3
  const accounts = await web3.eth.getAccounts()
  console.log(accounts)
}
Now we can call this function like this:
async componentWillMount() {
  await this.loadWeb3()
  await this.loadBlockchainData()
}
Now, when you visit the webpage, you should see your account logged to the console. Yay!
Next, we'll store the account in React's state object for later use. First, we'll define a default state for this component like this:
constructor(props) {
  super(props)
  this.state = {
    account: '',
    socialNetwork: null,
    postCount: 0,
    posts: []
  }
}
Now we'll assign the account to the state object in the last line of this function like this:
async loadBlockchainData() {
  const web3 = window.web3
  const accounts = await web3.eth.getAccounts()
  console.log(accounts)
  this.setState({ account: accounts[0] })
}
Now let's display the account on the page. I'm going to create a new React component for the Navbar that will make this much easier.
First, create a new component called code Navbar.js inside the same directory as the App.js component. Add this code to the file:
import React, { Component } from 'react';

class Navbar extends Component {

  render() {
    return (
      <nav className="navbar navbar-dark fixed-top bg-dark flex-md-nowrap p-0 shadow">
        <a
          className="navbar-brand col-sm-3 col-md-2 mr-0"
          href="http://www.dappuniversity.com/bootcamp"
          target="_blank"
          rel="noopener noreferrer"
        >
          Dapp University
        </a>
        <ul className="navbar-nav px-3">
          <li className="nav-item text-nowrap d-none d-sm-none d-sm-block">
            <small className="text-secondary">
              <small id="account">{this.props.account}</small>
            </small>
          </li>
        </ul>
      </nav>
    );
  }
}

export default Navbar;
I'll point out that this component reads the account with this.props.account. This makes use of React's props object, which is native to all React components. We will pass these props down to the navbar component momentarily.
Next, let's import the navbar component into App.js like this:
import Navbar from './Navbar'Now let's render out the navbar on the page. Delete all the old navbar code, and replace it with this:
<Navbar account={this.state.account} />Notice that we first fetch the account from state, and pass it down as the account prop when we render the component. That's what allows us to read its value with this.props.account inside the Navbar component.
You should be able to see your account inside the navbar whenever you refresh your webpage. Yay!
The last thing we'll do in this section is create avatars for our users on the social network.
We'll use Identicon.js to do this. This will allow us to automatically generate unique avatars for our users based upon their Ethereum address.
Let's start by adding the Identicon library to the "dependencies" section our package.json file like this:
"identicon.js": "^2.3.3",Now, install it like this:
$ npm install Because we installed a new library, we must restart our server. After you've stopped it, restart it like this:
$ npm run start Great! Now let's add the identicons. First, we must import the new library at the top of our Navbar component like this:
import Identicon from 'identicon.js';Now, we can update the navbar code to render out the Identicon on the page. Replace all the code inside your render() function with this:
render() {
return (
  <nav className="navbar navbar-dark fixed-top bg-dark flex-md-nowrap p-0 shadow">
    <a
      className="navbar-brand col-sm-3 col-md-2 mr-0"
      href="http://www.dappuniversity.com/bootcamp"
      target="_blank"
      rel="noopener noreferrer"
    >
      Dapp University
    </a>
    <ul className="navbar-nav px-3">
      <li className="nav-item text-nowrap d-none d-sm-none d-sm-block">
        <small className="text-secondary">
          <small id="account">{this.props.account}</small>
        </small>
        { this.props.account
          ? <img
            className='ml-2'
            width='30'
            height='30'
            src={`data:image/png;base64,${new Identicon(this.props.account, 30).toString()}`}
          />
          : <span></span>
        }
      </li>
    </ul>
  </nav>
);
Now go back to your browser and see your fancy new avatar at the top right hand of your app!
Awesome! We have made great progress in this section.
Part 5: Create The Newsfeed
Now let's create the newsfeed so that we can list out all the posts in our social network.
In order to do this, we need some post! Let's create one inside the truffle console. First, we'll open it like this:
$ truffle console Then inside the console, we'll create a new post like this:
socialNetwork = await socialNetwork.deployed()
await socialNetwork.createPost('This is my first post.')
Boom! We have a post. Now let's list this post out on the page.
We must first import our smart contract into the React app. Do this at the top of the App.js file:
import SocialNetwork from '../abis/SocialNetwork.json'This imports the smart contract ABI file that was generated by Truffle whenever we deployed the smart contract to the blockchain. This file contains a JSON description of how our smart contract works, like the kinds of functions it has and their arguments. It also tracks the address of the smart contract on the blockchain. We'll use both of these pieces of information to create a JavaScript version of the smart contract so that we can use it our app. You can watch this part of the video for an in-depth explanation of this file's contents.
Now that we have access to the smart contract ABI and address, let's create a JavaScript version with Web3.js like this:
async loadBlockchainData() {
  const web3 = window.web3
  // Load account
  const accounts = await web3.eth.getAccounts()
  this.setState({ account: accounts[0] })
  // Network ID
  const networkId = await web3.eth.net.getId()
  const networkData = SocialNetwork.networks[networkId]
  if(networkData) {
    const socialNetwork = web3.eth.Contract(SocialNetwork.abi, networkData.address)
    this.setState({ socialNetwork })
  } else {
    window.alert('SocialNetwork contract not deployed to detected network.')
  }
}
Here's what this code does:
- First, we fetch the
networkId
from Metamask, in this case577a.k.a. "Ganache". - Next, we read the smart contract data for this specific network, and save it as
newtorkData. This object contains our smart contract address which we read in the next few lines. - Next, we create a JavaScript version of the smart contract with
web3.eth.Contract. We pass in the smart contract ABI and address to do this. - Finally, we alert the user if no smart contract is detected, i.e., they're connected to a different network.
Great! Now we have a JavaScript version of the smart contract. Now we can call its functions inside the client side app.
Let's demonstrate that by loading all of the posts into our app so that we can list them on the page like this:
async loadBlockchainData() {
  const web3 = window.web3
  // Load account
  const accounts = await web3.eth.getAccounts()
  this.setState({ account: accounts[0] })
  // Network ID
  const networkId = await web3.eth.net.getId()
  const networkData = SocialNetwork.networks[networkId]
  if(networkData) {
    const socialNetwork = web3.eth.Contract(SocialNetwork.abi, networkData.address)
    this.setState({ socialNetwork })
    const postCount = await socialNetwork.methods.postCount().call()
    this.setState({ postCount })
    // Load Posts
    for (var i = 1; i <= postCount; i++) {
      const post = await socialNetwork.methods.posts(i).call()
      this.setState({
        posts: [...this.state.posts, post]
      })
    }
  } else {
    window.alert('SocialNetwork contract not deployed to detected network.')
  }
}
Let me explain this code:
- First we fetch the post count from the smart contract with
socialNetwork.methods.postCount().call(). Note, we must use thecall()function to return the data (it won't unless we do that). - Next, we store the post count to the state object.
- Then we create a loop to fetch all the posts. We fetch each post from id #1 all the way to the total post count (which is still just 1 in this case).
- While we loop through each post id, we fetch the post data from the mapping with
socialNetwork.methods.posts(i).call(). - Finally, we store the post data to state inside the
postsarray.
Great! Now we have posts inside our app. Let's list them out on the page.
In order to do this, a new component for all the page content inside the components directory called Main.js.
Inside this file, let's use this code to list out all the post data:
import React, { Component } from 'react';
import Identicon from 'identicon.js';

class Main extends Component {

  render() {
    return (
      <div className="container-fluid mt-5">
        <div className="row">
          <main role="main" className="col-lg-12 ml-auto mr-auto" style={{ maxWidth: '500px' }}>
            <div className="content mr-auto ml-auto">
              { this.props.posts.map((post, key) => {
                return(
                  <div className="card mb-4" key={key} >
                    <div className="card-header">
                      <img
                        className='mr-2'
                        width='30'
                        height='30'
                        src={`data:image/png;base64,${new Identicon(post.author, 30).toString()}`}
                      />
                      <small className="text-muted">{post.author}</small>
                    </div>
                    <ul id="postList" className="list-group list-group-flush">
                      <li className="list-group-item">
                        <p>{post.content}</p>
                      </li>
                      <li key={key} className="list-group-item py-2">
                        <small className="float-left mt-1 text-muted">
                          TIPS: {window.web3.utils.fromWei(post.tipAmount.toString(), 'Ether')} ETH
                        </small>
                        <button>
                          TIP 0.1 ETH
                        </button>
                      </li>
                    </ul>
                  </div>
                )
              })}
            </div>
          </main>
        </div>
      </div>
    );
  }
}

export default Main;
This code loops through all the posts contained in this.props.posts and renders them onto the page with bootstrap cards.
Here's each part of the post:
- Author address
- Author identicon
- Post content
- Tip amount
- Tips button (we'll wire that up momentarily)
Now let's include this component back in our App.js component by pasting this line in at the top:
import Main from './Main'Next, we'll replace the page content with the Main component like this:
render() {
  return (
    <div>
      <Navbar account={this.state.account} />
      <Main
        posts={this.state.posts}
        createPost={this.createPost}
        tipPost={this.tipPost}
      />
    </div>
  );
}
Lastly, we'll add a loader that will show when the page is still loading blockchain data like this:
render() {
  return (
    <div>
      <Navbar account={this.state.account} />
      { this.state.loading
        ? <div id="loader" className="text-center mt-5"><p>Loading...</p></div>
        : <Main
            posts={this.state.posts}
            createPost={this.createPost}
            tipPost={this.tipPost}
          />
      }
    </div>
  );
}
We can track the loading status on inside the React state object. We'll set it to true by default:
constructor(props) {
  super(props)
  this.state = {
    account: '',
    socialNetwork: null,
    postCount: 0,
    posts: [],
    loading: true
  }
}
And then we'll set it to false whenever the posts have finished loading like this:
async loadBlockchainData() {
  // ...

  // Load Posts
  for (var i = 1; i <= postCount; i++) {
    const post = await socialNetwork.methods.posts(i).call()
    this.setState({
      posts: [...this.state.posts, post]
    })
  }

  // Set loading to false
  this.setState({ loading: false})

  // ...
}
Now go back to your browser to see your first post listed on the page!
Part 6: Create Posts (Front End)
Now let's create a form so that we can create status updates that will show up in the news feed.
Inside the Main.js component, let's create a form just above the posts like this:
<form onSubmit={(event) => {
    event.preventDefault()
    const content = this.postContent.value
    this.props.createPost(content)
  }}>
  <div className="form-group mr-sm-2">
    <input
      id="postContent"
      type="text"
      ref={(input) => { this.postContent = input }}
      className="form-control"
      placeholder="What's on your mind?"
      required />
  </div>
  <button type="submit" className="btn btn-primary btn-block">Share</button>
</form>
In order for this form to work, we must create a function inside the App.js component like this:
createPost(content) {
  this.setState({ loading: true })
  this.state.socialNetwork.methods.createPost(content).send({ from: this.state.account })
  .once('receipt', (receipt) => {
    this.setState({ loading: false })
  })
};
Then, we must bind it to the component inside the constructor like this:
constructor(props) {
  // ...
  this.createPost = this.createPost.bind(this)
}
Finally, we'll pass the function down to the Main component so that it can be called in the form:
<Main
  posts={this.state.posts}
  createPost={this.createPost}
/>
YAY! Now you can post new content to the newsfeed.
Part 7: Tip Posts (Front End)
Now it's time to finish the last feature of our app: tipping posts.
Let's add this code to the <button> tag inside the Main component:
<button
  className="btn btn-link btn-sm float-right pt-0"
  name={post.id}
  onClick={(event) => {
    let tipAmount = window.web3.utils.toWei('0.1', 'Ether')
    this.props.tipPost(event.target.name, tipAmount)
  }}
>
  TIP 0.1 ETH
</button>
Now let's add the corresponding tipPost() function in the App.js component:
tipPost(id, tipAmount) {
  this.setState({ loading: true })
  this.state.socialNetwork.methods.tipPost(id).send({ from: this.state.account, value: tipAmount })
  .once('receipt', (receipt) => {
    this.setState({ loading: false })
  })
}
Then, we'll bind it to the component inside the constructor:
constructor(props) {
  // ...
  this.tipPost = this.tipPost.bind(this)
}
Finally, we'll pass it the Main component with props:
<Main
  posts={this.state.posts}
  createPost={this.createPost}
  tipPost={this.tipPost}
/>
AWESOME! Now you can post new content to the newsfeed.
Congratulations!!! You have just completed your first full stack blockchain application. Now you have an in depth understanding of how blockchain works as a developer.
FAQs
What Is Blockchain?
Blockchain Vs Cryptocurrency
How Does Blockchain Work?
Why Do We Need Blockchain?
Happy with this tutorial? Then you NEED to join my free training here where I'll show you how to build a real world blockchain app so that you can become a highly paid blockchain developer!
